Introduction
Congratulations with the purchase of the DQS, Dichotomous Question Survey Board!
Placing the DQS
The product you received is 'boxed'. Rez the box by dragging it from your inventory onto an empty spot in world.
Left click the box to open it's content and do copy all to inventory. Take care not do this procedure with the actual board, because then you will end up having the scripts inside your inventory and a not functioning product.
You will now have a folder in your inventory called: [SHX-DQS-200] or [SHX-DQS-210]
Rez the VWB (named: SHX-DQS-200, or SHX-DQS-210) by dragging it from your inventory onto an empty spot in world.
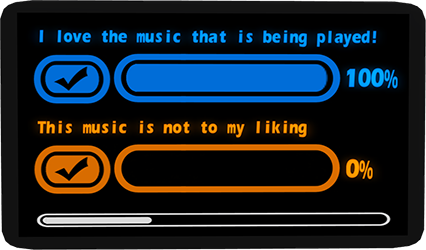 Image 1
1) A set amount of Maximum voters has been reached.
2) When you enabled it: The time period runs out
3) Unique voters memory limit has been reached (1000+ voters)
Quickstart - Touch Menu
Touch the board, it will bring up the main menu.
Click on [Q-List] to select one of the pre-defined questions.
Select Timed [*] if you want to run the Survey within a certain time period.
Select [Set Timer] to set the time you want it to run, in minutes.
Click on [Set Voters] if you want to have a maximum amount of voters.
Then Click Start to start the Survey.
Quickstart - Via Chat Commands
Enter the following in chat for a survey to ask if the people like the music, in a 10 minute period and a maximum of 25 people. The Survey will end as soon as the 25 people have voted, or the Survey has runned for 10 minutes, whatever comes first: (make sure you are within 20 meter range, if you are further away CTRL-ENTER to shout it, which is 100m range)
/113 25
/114 10
/111 Yes, I love this music
/112 No, this music is not to my liking
A menu pops up, click on Timed [_], so that Timed [*] will appear, then click on Start
Usage - Step by Step
When you have rezzed the board, it can be used immediately.
Just touch it to bring up the menu dialog like shown at image 2.
We talk about questions further on in the manual, but of course most examples are opposite statements on a particular subject.
A Dichotomous Survey is generally a "Yes/No" question, so it's best to ask two opposites.
To start a survey you need to set two questions.
This can be done in two ways:
- Click on the [Q-List] button to bring up a Quick-List of pre-defined questions. (see Image 3)
Make a choice by clicking on one of the questions.
Further on in this manual you can read how to define this list yourself. - You can also set the questions on the board yourself quickly and manually, without the Q-List:
Type in chat: /111 Question1
Followed by: /112 Question2
Of course, at text Question1/2 you write the question you like to see on the board
As soon as you have entered the second question, a menu will automatically pop up. so you can start quickly.
The menu dialog shows what options are selected:
Voting open: No/Yes -> This will show if the voting is in progress or not
Max voters: 10000 current: 2 -> This shows the maximum amount of people that can vote, and the current amount that have voted
Timed vote: Yes, time: 2 mins. -> Timed vote indicates if the survey will be held within a timewindow together with the time in minutes.
To change options on how the survey process should be executed, there are also 2 ways possible:
- To set the survey time window in minutes, you click on the [Set Timer] button to select one of the pre-defined times. To change the maximum amount of people that can vote, you click on [Set Voters].
- If you want to set the values manually, use the following chat commands:
/113 <#amount of voters>
/114 <#time in minutes>
For example, to set the a maximum of 100 voters and a 60 minutes timewindow, you enter:
/113 100
/114 60
To use the survey time based, you click on Timed [_], so that Timed [*] will appear. Click it again to disable the timer.
After you agree with the selected options. press Start to start the survey.
(note that chat commands do not automatically refresh an open menu dialog, click on the Timed button twice to refresh it to see any options changes)
People are now allowed to vote on one of the two questions. Anyone can vote, including the owner, but only once.
Voting is done by touching one of the check marks.
During or after the voting session you can click on the Stats button to see exactly how many people voted on each question.
The voting session will run until a condition is met that you have set: either the timer runs out (if you enabled it), the maximum amount of voters is reached or when a memory limit has been reached.
If you want to stop the Survey in progress manually, just click on Stop.
If you want to cancel a Survey or just clear the board, press Clear
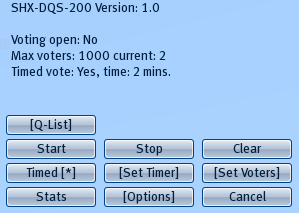 Image 2
Editing the Q-List - Pre-defined survey questions
The Q-List (image 3) is a list of questions that you can pre-define.
Rightclick the board and select Edit, then open the contents tab as shown in image 4.
Double-click on the notecard questions to modify it.
A set of two questions must be preceded by a buttonname, so it can be recognised in the menu (Image 3).
Format:
Q:Buttonname
Question 1
Question 2
You can define up to 50 sets of questions.
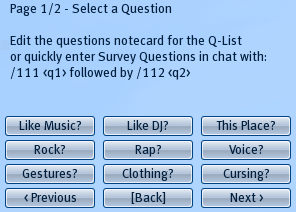 Image 3
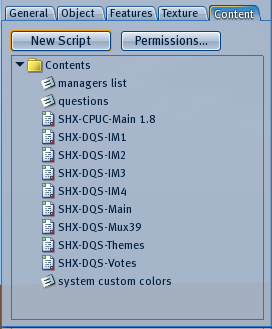 Image 4
Options
The options are pretty straighforward: You can change the font, colors (themes), see the product type/version, check if there is an update available and set Access to the menu. (Image 5)
If you have a SHX SRC Receiver, then you can retrieve the managers and dj lists from that receiver by clicking on Get Data. This requires that both this board and the SRC Receiver are on the same parcel, the parcel has not a blank name and they are not further away from eachother then 100 meter.
If you do not have a SHX SRC Receiver, you can edit the managers list notecard (see Image 4) to give access to others to the boards menu. When you saved the changes to the notecard, press Reset All to re-load the notecard.
Note that Djs access (set in the [Access] menu) is limited to when you retrieve a Dj list from a SRC Receiver, since you can not add Djs manually.
The DQS is SHX ColorHud compatible to easily change the colors remotely. You can also define a custom color set by editing the system custom colors notecard. Colors used in this notecard are in RGB values.
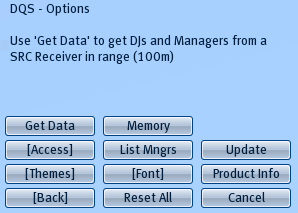 Image 5
Note on editing the board
The board is modify, so you can resize it to your liking.
Be assured though that you have the "Strech Textures" checked in the Edit window, otherwise it will ruin the textures on the board.
Linking/delinking is no problem, as long as you do not change the root prim that contains the scripts.
After re-linking you have to reset scripts with Reset All.